Creating lawn stripes transforms an ordinary grass surface into a professional-looking feature that enhances any property’s appearance. The technique relies on bending grass blades in opposite directions to create light and dark bands that catch sunlight differently. Many homeowners believe this requires expensive equipment or professional expertise, but basic striping can be achieved with standard mowing tools.
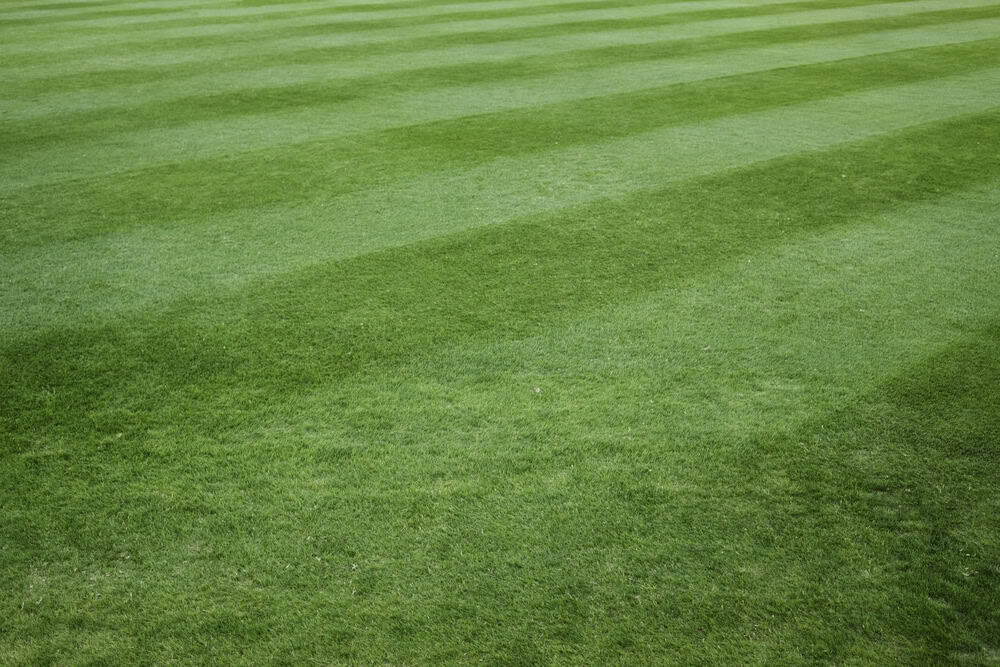
Lawn stripes form when grass blades are bent in alternating directions during mowing, with blades leaning away from the mower appearing lighter and those bending towards it appearing darker.
This optical effect becomes more pronounced on certain grass types and requires specific mowing patterns to achieve consistent results. The process involves understanding grass growth patterns, proper preparation techniques, and systematic mowing approaches.
Success depends on selecting appropriate equipment, maintaining consistent mowing heights, and following established patterns that create clean lines. Advanced techniques allow for more complex designs including diamonds, waves, and checkerboard patterns that rival professional sports grounds. Regular maintenance ensures stripes remain visible throughout the growing season whilst promoting healthy grass growth.
Understanding How Lawn Stripes Are Created
Lawn stripes form through the strategic manipulation of grass blade direction during mowing, creating visual patterns through light reflection. The appearance depends on the angle at which light hits bent grass blades and the viewer’s perspective.
The Science Behind Lawn Striping
Lawn stripes result from bending grass blades in opposite directions during the mowing process. When a mower passes over grass in one direction, it pushes the blades forward. A subsequent pass in the opposite direction bends the blades the other way.
The striped pattern becomes visible because bent grass blades reflect light differently depending on their orientation. This creates alternating bands of light and dark areas across the lawn surface.
Key factors that affect stripe visibility:
- Grass height and density
- Blade flexibility
- Mowing equipment type
- Soil moisture levels
Taller grass creates more pronounced stripes because longer blades bend more dramatically. Dense, healthy turf with flexible blades produces the clearest patterns.
Light Reflection and Grass Blade Direction
Grass blades bent towards the viewer appear darker because light reflects away from the eye. Blades bent away from the viewer look lighter as they reflect more light back.
The contrast between these light and dark bands creates the striped appearance. Morning and evening light enhance this effect because the sun’s lower angle creates more dramatic shadows.
Light reflection patterns:
- Blades bent towards viewer: Dark stripe
- Blades bent away from viewer: Light stripe
- Side lighting: Enhanced contrast
Weather conditions influence stripe visibility. Dewy mornings often show the most dramatic stripes because moisture on grass blades increases light reflection.
The viewing angle also affects stripe appearance. Walking around a striped lawn reveals how the pattern can appear to reverse as the perspective changes.
Visual and Aesthetic Benefits of Striped Lawns
Striped lawns create an impression of professional maintenance and attention to detail. The alternating pattern adds visual interest to otherwise uniform grass surfaces.
Property values may benefit from well-maintained striped lawns. Estate agents often highlight professional landscaping features when marketing homes.
Common striping patterns include:
- Straight parallel lines
- Diagonal stripes
- Checkerboard squares
- Diamond patterns
Straight stripes work best for rectangular lawns, while diagonal patterns can make narrow spaces appear wider. Checkerboard patterns require crossing perpendicular mowing passes.
The pattern remains visible for several days after mowing, depending on grass growth rate and weather conditions. Regular mowing maintains the striped appearance throughout the growing season.
Preparing Your Lawn for Stripes
Proper lawn preparation ensures stripes appear crisp and well-defined. A healthy, even lawn surface with consistent grass height creates the foundation for professional-looking patterns.
Assessing Lawn Health and Condition
Healthy grass is essential for creating visible stripes in your lawn. Weak or patchy grass won’t reflect light properly, making stripes appear faded or uneven.
Examine the lawn for brown patches, bare spots, or areas with thin grass coverage. These problem areas require attention before attempting to create stripes.
Check for signs of disease such as fungal infections or pest damage. Look for yellowing leaves, circular brown patches, or areas where grass appears to be dying.
Common lawn health indicators:
- Good: Dense, green grass with consistent colour
- Needs attention: Patchy areas, yellowing, or sparse growth
- Poor: Extensive bare spots, diseased areas, or severely thinned grass
Test soil pH using a home testing kit. Most grass types prefer a pH between 6.0 and 7.0 for best health and colour response.
Address any fertilisation needs at least two weeks before creating stripes. Apply appropriate lawn feed based on your grass type and current season.
Clearing Debris and Obstacles
Remove all debris from the lawn surface to ensure smooth mowing patterns. Leaves, twigs, stones, and toys can interfere with mowing equipment and create uneven cuts.
Walk the entire lawn systematically to spot potential obstacles. Pay particular attention to areas under trees where branches or nuts may have fallen.
Clear any temporary items such as garden furniture, hoses, or children’s toys. These objects can leave impressions in the grass or force you to mow around them.
Essential clearing checklist:
- Rake up leaves and organic debris
- Remove stones, sticks, and hard objects
- Clear pet waste
- Move portable items to storage
- Check for low-hanging branches
Mark permanent fixtures like sprinkler heads or garden borders. Knowing their locations helps you plan stripe patterns that work around these features.
Ensure gates and pathways are clear for easy access with mowing equipment. This prevents having to stop and move obstacles mid-mowing.
Proper Lawn Height and Watering
Set the correct grass height before creating stripes. Most grass types should be cut to 2.5-3 inches for best stripe visibility.
Avoid cutting more than one-third of the grass blade length in a single mowing. If your lawn is overgrown, reduce height gradually over several cuts.
Recommended cutting heights by grass type:
- Fine fescue: 2-3 inches
- Perennial ryegrass: 2-3 inches
- Tall fescue: 2.5-3.5 inches
- Bermuda grass: 1-2 inches
Water the lawn 24-48 hours before mowing if conditions have been dry. Adequately hydrated grass cuts more cleanly and recovers faster.
Check soil moisture by inserting a screwdriver 3 inches into the ground. If it penetrates easily, moisture levels are adequate for mowing.
Avoid mowing wet grass as it can clump and create uneven cuts. Wait until morning dew has evaporated and grass blades are dry to the touch.
Choosing the Right Tools and Equipment
The right mower type creates the foundation for lawn striping, whilst rollers and striping kits enhance the stripe effect. Sharp strimmers help maintain clean edges that complete the professional appearance.
Selecting a Suitable Lawn Mower
Cylinder mowers produce the sharpest stripes due to their cutting action and rear roller. The blades cut grass cleanly whilst the roller flattens it in alternating directions.
Rotary mowers can create stripes when fitted with a rear roller attachment. Models with larger rear wheels or roller systems work better than basic designs. The cutting height should remain consistent across the lawn.
Key cylinder mower features:
- Sharp blade cylinder
- Heavy rear roller
- Adjustable cutting height
- Adequate engine power
Self-propelled models reduce fatigue during striping passes. The operator can focus on maintaining straight lines rather than pushing the machine. Battery-powered options offer quieter operation for residential areas.
Blade sharpness affects stripe quality significantly. Dull blades tear grass rather than cutting cleanly, reducing the light reflection difference between stripe directions.
Benefits of Rollers and Striping Kits
Lawn striping kits attach to existing mowers without rear rollers. These kits typically include a weighted flap or small roller that bends grass after cutting. The bent grass creates the light and dark pattern.
Striping kit advantages:
- Works with most rotary mowers
- Easy installation process
- Adjustable pressure settings
- Cost-effective solution
Separate lawn rollers can enhance existing stripes after mowing. Heavy rollers create more pronounced patterns but require careful use to avoid soil compaction. Water-filled rollers offer adjustable weight.
The roller weight should match the grass type and soil conditions. Light rollers work for delicate grasses, whilst heavier ones suit robust turf varieties.
Spring-loaded striping kits adjust automatically to ground contours. Fixed rollers may scalp uneven areas or miss contact points entirely.
Using a Strimmer for Edges and Corners
Edge trimming completes the professional striping appearance. A strimmer removes grass that the lawnmower cannot reach along borders and around obstacles.
Battery-powered strimmers provide sufficient power for most lawns whilst eliminating petrol mixing requirements. Cordless models offer better manoeuvrability around planted areas and garden features.
Strimmer selection criteria:
- Adequate battery life
- Adjustable cutting head
- Comfortable grip design
- Variable speed control
The cutting head angle affects precision along lawn edges. Adjustable heads allow operators to maintain consistent edge height whilst following border contours.
Line thickness influences cutting performance and durability. Thicker lines last longer but require more power. Standard 2mm line suits most residential applications effectively.
Regular line replacement maintains cutting efficiency. Automatic feed systems reduce downtime compared to manual bump-feed mechanisms during extended trimming sessions.
Step-by-Step Guide to Mowing Stripes
Creating professional-looking stripes requires proper planning of your mowing pattern and consistent execution of straight, parallel lines. Sharp edges and maintaining the same direction for each stripe will produce the most striking visual contrast.
Planning Your Striping Pattern
The mowing pattern should be planned before starting the first pass. Homeowners need to consider the lawn’s shape, size, and any obstacles like trees or flower beds.
Basic stripe patterns include:
- Straight parallel lines
- Diagonal stripes at 45-degree angles
- Checkerboard patterns using perpendicular passes
- Curved stripes following natural landscape contours
Start with straight parallel stripes for beginners. This pattern is the easiest to execute and provides excellent results when learning how to mow stripes.
Mark the starting point at one edge of the lawn. Choose the longest possible run to minimise the number of turns required. Avoid starting in corners where manoeuvring the mower becomes difficult.
Consider the lawn’s primary viewing angle. Stripes should run perpendicular to where people typically view the lawn for maximum visual impact.
Executing Straight and Parallel Lines
Begin mowing along the predetermined starting line at a steady walking pace. Keep the mower deck level and maintain consistent ground speed throughout each pass.
Use a fixed point in the distance as a guide for straight lines. Trees, fence posts, or buildings work well as reference points. Focus on this target rather than looking down at the grass directly in front of the mower.
Key execution steps:
- Complete the first stripe from start to finish without stopping
- Turn around at the end and position for the adjacent stripe
- Ensure no gaps exist between striping passes
- Maintain the same speed and deck height for each stripe
Overlap each pass by 2-3 centimetres to prevent uncut grass strips. This slight overlap ensures complete coverage whilst maintaining clean stripe definition.
Maintaining Consistency in Mowing Direction
Each stripe must be mowed in alternating directions to create the light and dark visual effect. The first stripe goes in one direction, the second stripe returns in the opposite direction.
Never mow two adjacent stripes in the same direction. This eliminates the contrasting grass blade angles that create the striping effect when mowing stripes.
Keep the mower deck at the same height throughout the entire session. Height variations will create uneven grass length and disrupt the stripe pattern.
Maintain consistent walking speed between stripes. Varying speeds create different grass cutting patterns that interfere with uniform stripe appearance.
Direction consistency checklist:
- First pass: North to South
- Second pass: South to North
- Third pass: North to South
- Continue alternating pattern
Tips for Sharp Lawn Edges
Clean, defined edges enhance the overall stripe appearance. Use an edging tool or string trimmer along walkways, driveways, and flower beds after mowing.
Edge maintenance techniques:
- Edge after completing all stripes
- Cut grass clippings away from hard surfaces
- Maintain a 90-degree angle between lawn and pavement
- Remove debris from edge lines immediately
Create buffer zones around obstacles. Leave 30-45 centimetres of space around trees and garden features to allow proper mower manoeuvring without disrupting stripe alignment.
Finish with a perimeter pass around the entire lawn. This final pass cleans up any irregular cuts and provides a professional border frame for the striped pattern.
Sharp mower blades are essential for clean cuts that enhance stripe definition. Dull blades tear grass rather than cutting cleanly, reducing the contrast between light and dark stripes.
Advanced Patterns and Techniques
Diagonal cuts create diamond-like patterns whilst checkerboard mowing adds complexity to traditional lawn stripes. Irregular shaped lawns require specific approaches and proper technique adjustments enhance stripe visibility regardless of lawn conditions.
Diagonal and Checkerboard Stripes
Diagonal stripes require mowing at 45-degree angles to the lawn’s longest edge. Start at one corner and maintain consistent parallel lines across the entire lawn surface.
Diagonal Pattern Steps:
- Mark the first diagonal line with stakes
- Mow parallel strips in one direction
- Return in opposite direction for contrasting strips
- Maintain 45-degree angle throughout
Checkerboard patterns combine perpendicular mowing directions. Mow standard parallel stripes first, then cut perpendicular lines over the existing pattern.
The checkerboard effect works best on lawns measuring at least 20 by 20 feet. Smaller lawns make the pattern appear cramped and difficult to distinguish.
Timing Requirements:
- Allow 2-3 days between perpendicular cuts
- Avoid cutting in wet conditions
- Use sharp blades for clean grass cuts
Creating Patterns in Irregular Shaped Lawns
Curved lawn edges require modified striping approaches. Follow the natural contours of the lawn rather than forcing straight geometric patterns.
Start mowing parallel to the longest straight section of the lawn. Adjust stripe direction gradually as the lawn curves, maintaining consistent spacing between stripes.
Curved Lawn Techniques:
- Use shorter mowing strips near edges
- Overlap slightly on curved sections
- Focus on overall visual balance
- Accept some pattern irregularity
L-shaped and complex lawn geometries benefit from zone-based striping. Divide the lawn into rectangular sections and create separate stripe patterns for each zone.
Connect different zones by aligning stripe directions where sections meet. This creates visual flow whilst accommodating the lawn’s natural boundaries.
Techniques for Enhancing Stripe Visibility
Grass height affects stripe contrast significantly. Maintain grass at 7-10cm for optimal light reflection differences between cut directions.
Fertiliser application timing influences stripe appearance. Apply nitrogen fertiliser 2-3 weeks before important events to darken grass colour and increase contrast.
Equipment Modifications:
- Add weight to mower for better grass bending
- Install striping attachments or rollers
- Use mulching blades for cleaner cuts
- Maintain consistent mowing speed
Watering practices impact stripe longevity. Water early morning to allow grass blades to stand upright before evening viewing hours.
Morning and late afternoon lighting showcase mowing stripes most effectively. Plan important lawn viewing times around these natural lighting conditions.
Regular mowing maintains stripe definition. Cut grass every 5-7 days during growing season to preserve pattern clarity and prevent overgrowth from obscuring the design.
Maintaining Your Striped Lawn
Consistent mowing patterns and proper timing preserve striping effects whilst regular fertilisation and watering maintain grass density. Addressing thatch buildup and uneven growth prevents pattern degradation over multiple seasons.
Regular Maintenance and Seasonal Tips
Weekly mowing schedule maintains crisp stripe definition throughout the growing season. Change mowing direction every 2-3 cuts to prevent grass from permanently leaning in one direction.
Cut grass height between 6-10cm for best striping results. Shorter cuts reduce light reflection differences whilst longer grass creates more dramatic stripe contrast.
Seasonal timing varies by grass type and climate:
| Season | Cool-Season Grass | Warm-Season Grass |
|---|---|---|
| Spring | Begin striping April-May | Start striping May-June |
| Summer | Maintain weekly cuts | Reduce to bi-weekly in heat |
| Autumn | Continue through October | Stop striping September |
| Winter | Cease mowing November-March | Resume striping March-April |
Apply light fertiliser every 6-8 weeks during active growth periods. Water deeply twice weekly rather than daily light watering to encourage strong root development.
Addressing Common Problems
Fade patterns result from inconsistent mowing height or dull mower blades. Sharpen blades every 6 months and calibrate cutting height weekly using a ruler.
Uneven stripes indicate lawn maintenance issues like compacted soil or thatch buildup. Aerate compacted areas using a core aerator in spring or autumn.
Brown stripe edges suggest scalping from uneven terrain. Fill low spots with topsoil and sand mixture before the growing season begins.
Weeds disrupt stripe uniformity by growing at different rates than surrounding grass. Apply pre-emergent herbicide in early spring and spot-treat broadleaf weeds immediately.
Equipment problems cause inconsistent results. Clean mower deck after each use and replace worn striping attachments annually for consistent grass bending.
Promoting Grass Health Over Time
Dense, healthy turf creates the most visible stripes through uniform growth and colour. Overseed thin areas each autumn with matching grass varieties.
Test soil pH annually and maintain levels between 6.0-7.0 for cool-season grasses or 6.5-7.5 for warm-season varieties. Apply lime or sulphur as needed based on test results.
Deep root systems support consistent growth patterns essential for striping. Reduce watering frequency whilst increasing duration to encourage roots to grow deeper.
Monitor for disease symptoms like brown patches or fungal growth. Improve air circulation by pruning nearby shrubs and avoid watering in evening hours.
Soil compaction from repeated mowing patterns requires annual attention. Core aerate high-traffic areas and vary mowing routes slightly to distribute weight across different areas.
Apply organic matter like compost each spring to improve soil structure and nutrient retention for sustained grass health.
Lawn Stripe FAQs
How do I create stripes in my lawn?
To create stripes in your lawn, you can use a striping kit for your mower or a roller. Before mowing, decide on the pattern you want to create, such as stripes, checkerboards, or diamonds. Mow in straight lines and consider using a lawn roller to intensify the stripes. Remember to mow with a sharp blade and feed your lawn regularly for optimal results.
How do stripes appear in a lawn?
The effect of stripes on a lawn is created by the reflection of light off the grass blades. When the grass blades are bent towards you, they appear darker, while when they are bent the opposite way, they appear lighter. Creating patterns with striping enhances this principle and creates a more pronounced striped effect.
What patterns can I create in my lawn?
The possibilities for creating patterns in your lawn are endless. Some common patterns include stripes, checkerboards, and diamonds. It all depends on your personal preference and the layout of your lawn. You can create these patterns with a ruler and a bit of planning, mowing in different directions and angles.
How can I mow in straight lines?
To achieve crisp and straight lines in your lawn, start by mowing parallel to a straight sidewalk or driveway as a guide. Keep your focus at least 10 feet ahead of you while mowing, instead of looking directly in front of the mower. When you reach the end of a row, lift the mower deck as you turn and mow in the opposite direction next to your previous pass. For a checkerboard pattern, mow the lawn a second time at a 90-degree angle to the first mowing. Finish by mowing a strip around the edges of the lawn to complete the look.
How can I make my stripes more pronounced?
To make your stripes more pronounced, you can use a lawn roller. If you don’t have a roller, you can rent or purchase one. After mowing, go back over your stripes and roll the grass in the same direction you mowed. This will further bend the grass blades and make the stripes more dramatic, giving your lawn a professionally striped appearance.
How can I create a vivid stripe pattern?
To create a vivid stripe pattern, mow your lawn at a higher setting than usual. This means leaving your grass a bit taller, as taller grass bends over more easily, making the stripes more noticeable. Raising the mowing height even by a half-inch can make a significant difference in the contrast between the striped and non-striped areas. Additionally, it’s important to feed your lawn regularly with a high-quality lawn food to promote thick and lush growth. Always mow with a sharp blade for a clean cut and maintain regular lawn maintenance practices.
What kind of grass is best for striping?
Cool-season grasses like fescue, rye, or bluegrass are ideal for creating vivid lawn stripes. These grasses bend more easily and produce a more pronounced striping effect. On the other hand, warm-season grasses like Bermuda and zoysia don’t bend as much and may not show stripes as clearly. You can use grass seeds or sod to create the desired lawn type for striping.
What are the benefits of lawn striping?
Lawn striping goes beyond visual appeal. It gives your yard a professional and well-maintained appearance, similar to what you might see in golf courses or stadiums. It improves your curb appeal and can make you the envy of your neighborhood. Additionally, lawn striping encourages regular maintenance practices such as weeding and reseeding, resulting in a healthier and more vibrant lawn. The stripes can also be used as a guide for fertilizing or seeding specific areas, adding elegance and sophistication to your outdoor space.
What are some tips for achieving striped lawn?
To achieve striped lawn, choose the right kind of grass, plan your pattern, mow in straight lines, and consider using a lawn roller. Maintain proper lawn care practices, such as mowing at a higher height, feeding your lawn regularly, and mowing with a sharp blade. By following these tips, you’ll be able to create stunning stripes in your lawn and enjoy a well-manicured and visually appealing outdoor space.
